Estimated reading time: 2 minute(s)
There are certain desserts that everyone can agree on and one of them is the brownie. It’s hard to resist when you see one on the menu at a restaurant, whether it’s to have all to yourself or to share.
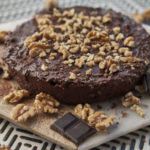
Today, I’ve brought out all the secret tips and tricks you need to make this exquisite traditional brownie.
The History
There are many theories about how the brownie originated but, it seems that most sources agree that it was thanks to a fortunate mistake (like- many other happy accidents). In 1897, a cook in the United States forgot to add yeast to a chocolate cake.
Resulting in a compact, flat, crunchy on the outside, juicy on the inside cake. It was so well liked that it became many patrons’ favorite dessert.

Would you believe me if I told you the brownie I’ve brought you today, contains no added sugar?!
Traditional American brownie recipes are packed with sugar. So, I decided to switch out the sugar with some roasted pumpkin, a little date paste, and a touch of vanilla this time. Don’t forget though there are many ways to substitute sugar, like we saw in our post a few weeks ago, you can use a ripe banana, roasted carrot, or even baked apples…
The end product is spectacular! I have to say that none of my guests believed that there wasn’t an ounce of sugar in it. This is a must-try!
Tricks for the perfect brownie
- The type of chocolate: I can’t stress enough how important it is to choose good quality chocolate- natural with no added sugars or sweeteners. Make sure it’s at least 70% cacao, otherwise, it won’t have enough intensity for the flavor. I always reach for a bar of Dark Chocolicius.
- Quality ingredients: Yes, the chocolate is important but all your ingredients (milk, butter…) should be organic and from free-range/pastured farms.
- The order of ingredients: First melt the chocolate with the butter, and let it get to room temperature before adding it into the rest of the dough. Then add the eggs in slowly- one by one. And, only after everything is completely blended together, add the sifted flour and soluble cacao, making sure there are no lumps.
- How should you mix it? Ideally, use a whisk.
- Oven temperature: The brownie is baked at a fairly high temperature to get that nice crunchy crust. It depends on your oven, but between 200 and 220ºC is recommended.
- Ideal texture: It should be slightly moist. Like many American pastries, such as cookies or muffins, the brownie requires little baking time.
- No yeast: this dessert doesn’t call for yeast because we aren’t looking to achieve the same spongy texture you get with a traditional cake.
- Do you need to let it sit? Noooooo! Probably one of the best things is that you can jump right into your brownie as soon as you take it out of the oven- just be careful not to burn yourself!
- The perfect pair: Vanilla ice cream is a classic, but don’t be afraid to experiment with yogurt or some Cocoa and Hazelnut Spread which I actually decided to use this time.

The Perfect Brownie
Ingredients
- 200 gr roasted pumpkin
- 80 gr Cacao Powder
- 40 gr Chocolicius Negro
- 100 gr date paste
- 20 gr butter
- 100 ml milk
- 2 eggs
- a pinch salt
- 1 tbsp vanilla
- 70 gr Chocolate Oat Flour
- a handful walnuts
Dressing on top:
Instructions
-
Have the roasted pumpkin prepared beforehand.
-
Melt the Chocolicius chocolate with the butter. Let it cool to room temp.
-
Mix the pumpkin together with the chocolate, date paste, milk, salt, and vanilla.
-
Then add the eggs (slowly, one by one), and lastly throw in the sifted flour and cacao. Mix everything with a whisk until the mixture is uniform and lump-free.
-
Add in the walnuts.
-
Pour the mixture into the mold which you’ve already greased with butter.
-
Bake for 25-30 minutes at 220º.
-
Remove from oven and immediately top with the Cocoa and Hazelnut spread to taste.
-
Garnish with some more walnuts and an ounce of Chocolicius (optional but delicious).


